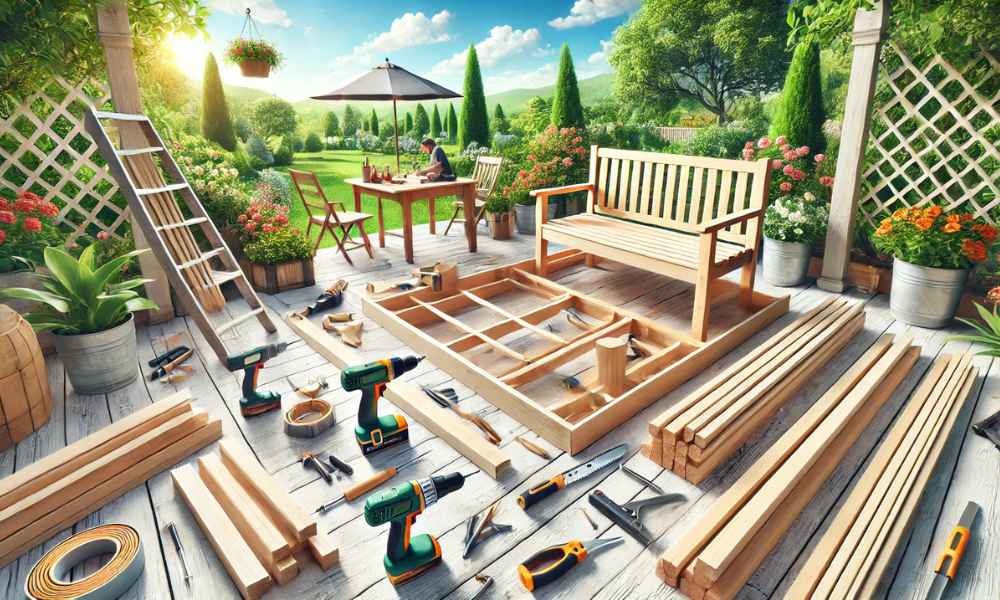
Imagine sipping your morning coffee in the serenity of your garden, comfortably seated on a handcrafted bench that you built yourself. Crafting your own outdoor seating bench is not only a rewarding project but also an excellent way to enhance your garden or patio space. Whether you’re looking to add a rustic charm to your backyard or create a practical seating area, learning how to build outdoor seating benches is an invaluable skill. This guide will walk you through the entire process, from selecting the ideal location to cutting, assembling, and finishing your bench. With the right tools, materials, and a little patience, you can create a sturdy and stylish outdoor bench that stands the test of time.
Choosing the Perfect Spot for Your Outdoor Bench
Before you start cutting wood and hammering nails, selecting the right location for your bench is crucial. A well-placed bench can transform an ordinary space into a tranquil retreat.
- Assess Your Yard’s Layout – Observe your outdoor space at different times of the day to determine the best spot. Do you want your bench to be in full sun, partial shade, or nestled beneath a tree for natural shelter?
- Consider Functionality – Think about how you’ll use the bench. Should it face a flower garden, a fire pit, or offer a clear view of a scenic landscape?
- Check Ground Stability – Avoid placing your bench on uneven or overly soft ground. A flat, well-compacted area will ensure stability and longevity.
- Accessibility Matters – Position your bench in a convenient location where people can easily reach and use it without obstructions.
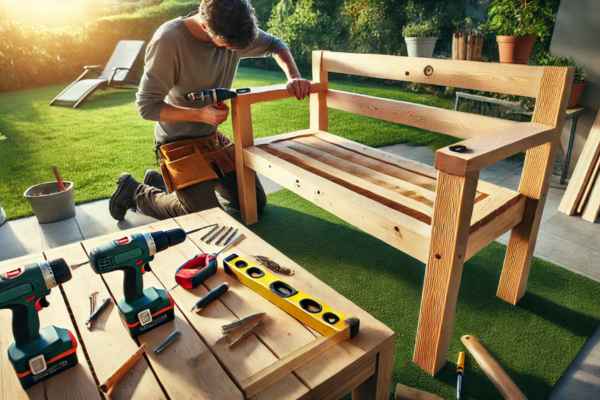
Essential Tools and Materials You’ll Need
Building an outdoor bench doesn’t require an elaborate workshop, but having the right tools and materials will make the process smoother.
Basic Tools:
- Measuring tape and pencil – Accuracy is key when cutting wood.
- Circular saw or hand saw – Essential for precise cutting.
- Cordless drill and screwdriver – For securing screws and fasteners.
- Clamps – To hold pieces together while assembling.
- Sandpaper or power sander – Ensures a smooth, splinter-free finish.
- Paintbrushes or sprayer – For applying sealants or paint.
Materials:
- Wood planks (cedar, redwood, or treated pine) – These are durable and naturally resistant to rot.
- Galvanized screws or bolts – These will prevent rusting and enhance durability.
- Wood glue – Adds extra stability to joints.
- Outdoor wood stain or sealant – Protects against moisture and UV damage.
Planning Your Bench Design
Designing your bench before construction is essential. A well-thought-out plan will prevent common mistakes and ensure a seamless building process.
- Choose Your Bench Style – Decide whether you want a classic straight-back bench, a curved design, or a simple backless seat.
- Sketch a Blueprint – Drawing a simple design with dimensions will help you visualize the final product.
- Determine Seating Capacity – Will your bench accommodate two people, or do you need a longer structure for more guests?
- Incorporate Aesthetic Touches – Consider adding armrests, storage compartments, or decorative engravings.
Measuring and Cutting the Wood
Precision in measuring and cutting ensures your bench comes together seamlessly.
- Measure Twice, Cut Once – Always double-check your dimensions before cutting to avoid mistakes.
- Mark Cutting Lines Clearly – Use a pencil or chalk to indicate where you’ll cut.
- Use a Saw Guide – This helps keep cuts straight and even.
- Smooth Out Edges – Sanding down rough edges will enhance safety and give a polished look.
Step-by-Step Guide: How to Build Outdoor Seating Benches
Creating an outdoor seating bench may seem like a daunting task, but with the right approach, it becomes a fulfilling and straightforward project. This step-by-step guide will help you build a durable, attractive bench that enhances your outdoor space. Whether you’re a beginner or have some DIY experience, these steps will ensure your bench is both functional and visually appealing.
Building the Bench Frame: A Solid Foundation
The frame is the backbone of your bench, providing structure and support. A well-built frame ensures durability and comfort.
1. Measure and Cut the Frame Pieces
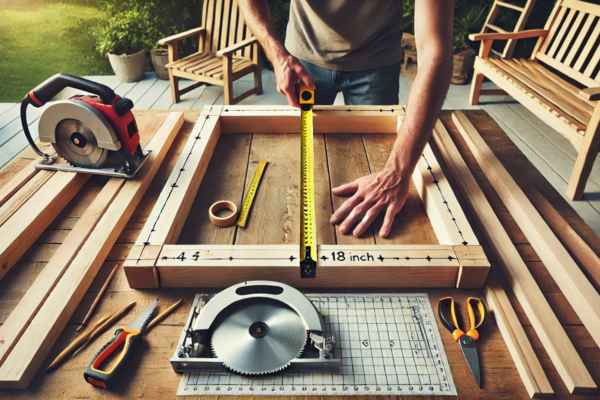
- Start with precise measurements based on your desired bench length and width. Common dimensions are around 4 to 6 feet long and 18 inches deep.
- Use a circular saw for straight cuts. Double-check measurements to avoid errors.
2. Assemble the Outer Frame
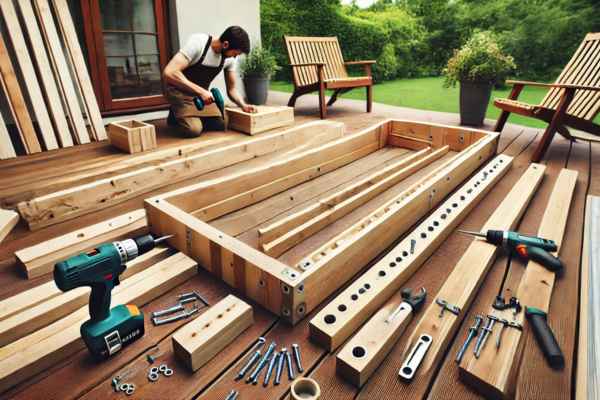
- Lay out the side pieces (front and back rails) and connect them using galvanized screws or bolts to prevent rust.
- Attach shorter end pieces to create a rectangular frame. Use wood glue at the joints for extra strength.
3. Add Support Beams

- For added stability, install cross-support beams inside the frame. These prevent sagging, especially for longer benches.
- Secure these beams with screws, ensuring they’re evenly spaced for balanced weight distribution.
4. Check for Square
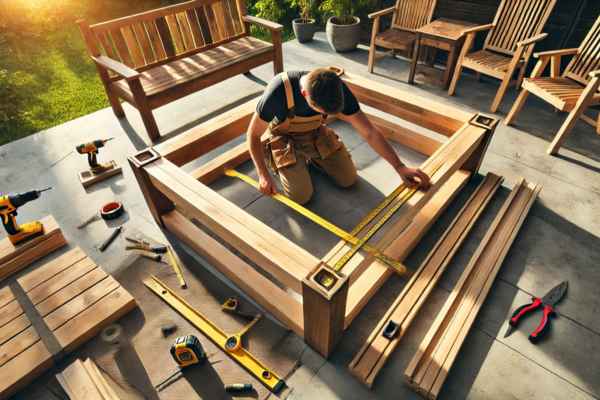
- Use a carpenter’s square to ensure all corners are at a perfect 90-degree angle. This keeps the bench stable and prevents wobbling.
Assembling the Seat and Backrest for Maximum Comfort
Once the frame is solid, it’s time to focus on the seating surface and backrest, where comfort is key.
1. Prepare the Seat Slats
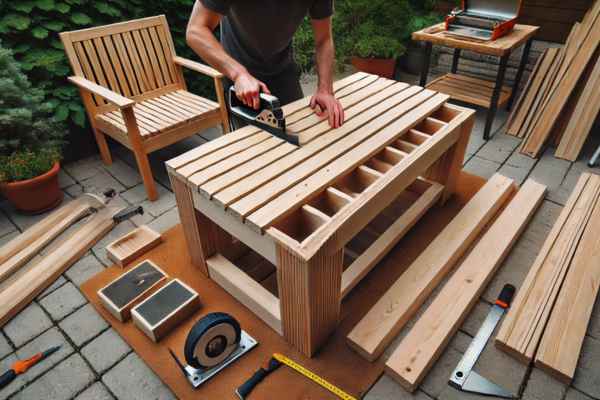
- Cut wooden planks to fit across the top of the frame, leaving a slight gap (about ¼ inch) between each slat for water drainage.
- Sand the edges to avoid splinters.
2. Attach the Seat Slats
- Place the slats evenly across the frame.
- Secure each slat with two screws at both ends, drilling pilot holes first to prevent the wood from splitting.
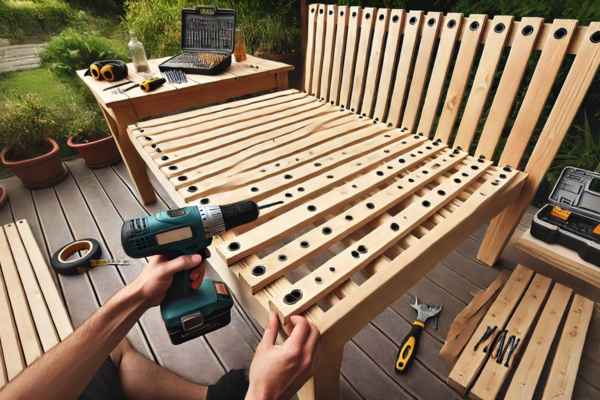
3. Construct the Backrest Frame
- For a straight backrest, cut two vertical support posts to the desired height (usually around 18-20 inches).
- Connect these posts with horizontal planks to create the backrest structure.
4. Install the Backrest
- Attach the backrest frame to the bench using heavy-duty screws at a slight recline for ergonomic comfort.
- Add backrest slats horizontally or vertically based on your design preference.
5. Optional: Add Armrests
- For extra comfort, attach armrests to the top of the side frames.
- Ensure they’re level and securely fastened.
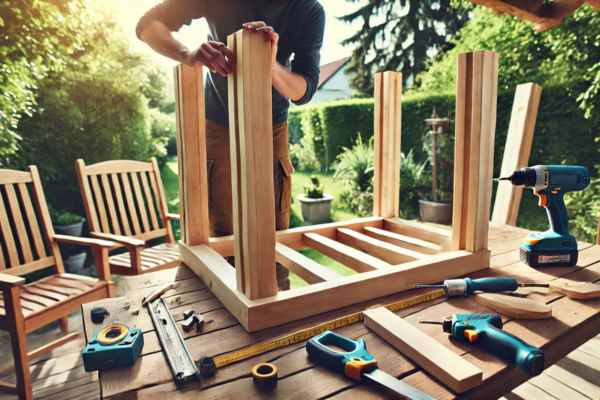
Securing the Legs for Stability and Safety
Sturdy legs are essential to support the weight and ensure the bench doesn’t wobble over time.
1. Choose the Right Leg Style
- You can opt for straight legs, angled legs, or even a trestle base depending on the design.
- Use thick, sturdy wood like 4×4 posts for strong support.
2. Position the Legs Correctly
- Place the legs at each corner of the bench frame.
- For added stability, consider placing a center support leg, especially for longer benches.
3. Attach the Legs Securely
- Use lag bolts for maximum strength. Drill pilot holes first, then tighten the bolts with a wrench.
- Add corner braces or metal brackets for extra reinforcement.
4. Check for Level
- Flip the bench upright and use a spirit level to ensure the seat is even.
- If there’s any wobbling, adjust the leg placement or sand the bottom of the legs slightly.
5. Safety Check
- Ensure all screws are tight, and there are no sharp edges.
- Test the bench by applying pressure to different areas to confirm its sturdiness.
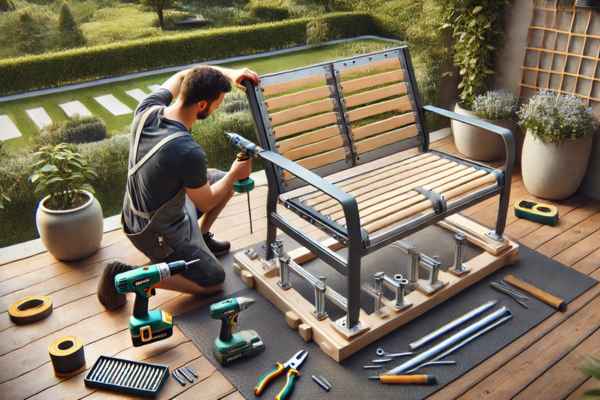
Adding Support and Reinforcement
Support and reinforcement are critical to ensure your bench can withstand daily use and various weather conditions. Even if your bench feels sturdy after the initial assembly, reinforcing key structural points adds longevity and prevents future issues like wobbling or sagging. Start by installing cross braces underneath the seat. These can be diagonal or horizontal beams that connect the legs, distributing weight more evenly. Use metal brackets or corner braces at joint connections for additional stability. If the bench is particularly long, adding a center support leg can prevent the middle from bowing over time. Don’t underestimate the power of wood glue alongside screws—this combination significantly strengthens the joints. Reinforcement not only boosts durability but also gives you peace of mind knowing your bench can handle everything from solo reading sessions to lively garden gatherings.
Sanding and Smoothing for a Professional Finish
A well-built bench deserves a professional finish, and that starts with thorough sanding. This step is often overlooked, but it’s essential for both aesthetics and safety. Rough edges, splinters, and uneven surfaces can make the bench uncomfortable and even hazardous, especially for children. Begin with coarse-grit sandpaper (around 60-80 grit) to smooth out any rough patches, knots, or imperfections. Gradually work your way up to finer grits (120-150 grit) for a silky finish. Use a power sander for larger surfaces to save time, but don’t forget to hand-sand corners and tight spots. Sanding not only smooths the surface but also helps paint, stain, or sealant adhere better, enhancing the longevity of your finish. After sanding, wipe the bench with a damp cloth to remove dust before moving to the next step.
Painting or Staining Your Bench
Applying a finish not only enhances the beauty of your outdoor seating bench but also protects it from the elements. When deciding between painting and staining, consider both aesthetic preferences and durability requirements.
- Painting: If you prefer bold, vibrant colors, go for outdoor-grade paint. It provides a thick layer of protection against moisture and UV rays. Use a primer first to ensure better adhesion and longer-lasting results. Apply at least two coats of paint, allowing each layer to dry thoroughly.
- Staining: For a more natural look that showcases the wood grain, choose an exterior wood stain. Stains penetrate the wood, offering excellent protection while highlighting the wood’s texture. After staining, apply a clear sealant to add a waterproof layer.
Regardless of your choice, always opt for weather-resistant products designed for outdoor use. This step not only elevates the appearance of your bench but also significantly extends its lifespan.
Creative Add-Ons to Personalize Your Bench
One of the best parts about building your own outdoor bench is the freedom to customize it to your taste. Personalizing your bench can transform it from a simple seating option to a standout feature in your outdoor space. Consider adding built-in storage beneath the seat—perfect for stashing garden tools, cushions, or outdoor toys. For added comfort, attach padded seat cushions with weather-resistant fabric. Want to go even further? Add armrests or even cup holders carved into the sides for ultimate relaxation. Decorative elements like wood carvings, engraved designs, or even incorporating tile mosaics on the backrest can give your bench a unique flair. If you’re into rustic charm, consider using reclaimed wood with its natural imperfections as a design feature. Personal touches not only reflect your style but also make your bench a conversation starter during outdoor gatherings.
Eco-Friendly Bench Ideas for Sustainable Gardening
Sustainability is important to you, building an eco-friendly bench is a fantastic way to support the environment while adding functionality to your garden. Start by sourcing reclaimed wood from old furniture, pallets, or construction sites. Not only does this reduce waste, but reclaimed wood also adds character with its weathered textures and rich history. Opt for non-toxic, water-based finishes instead of traditional paints or stains that contain harmful chemicals. These eco-friendly products are safer for the environment and your health. When selecting screws or fasteners, choose galvanized or stainless steel to prevent rust and prolong the bench’s life, reducing the need for replacements.
Maintenance Tips to Keep Your Bench Looking New
Outdoor benches are constantly exposed to the elements—sun, rain, wind, and even snow—which can cause wear and tear over time. Regular maintenance is key to preserving the beauty and durability of your seating bench. Start by cleaning your bench regularly with mild soap and water to remove dirt, mold, or mildew. Avoid using harsh chemicals that could damage the wood or finish. Once cleaned, inspect the bench for signs of wear, such as cracks, loose screws, or fading finishes. Tighten any loose hardware and sand down rough spots that may have developed.
Applying a fresh coat of sealant or weatherproof paint once a year will help protect the wood from moisture and UV damage. If your bench is exposed to extreme weather conditions, consider using a protective cover during the off-season or moving it to a sheltered spot. With consistent care, your outdoor bench can remain a beautiful centerpiece for many years.
Common Mistakes to Avoid When Building Outdoor Seating Benches
Even with the best intentions, DIY projects can sometimes go awry. Here are some common mistakes to avoid when building outdoor seating benches:
- Neglecting Accurate Measurements: One of the most frequent errors is inaccurate measuring, which leads to uneven seating and unstable structures. Always measure twice and cut once to ensure precision.
- Using the Wrong Type of Wood: Not all wood is suitable for outdoor use. Choosing untreated or low-quality wood can result in quick deterioration due to exposure to the elements.
- Skipping Reinforcement: Some DIYers overlook the importance of reinforcement, leading to weak joints that can loosen over time. Adding cross braces and corner supports will enhance stability.
- Improper Finishing: Failing to sand properly or neglecting to apply a protective finish can leave the bench vulnerable to splinters, water damage, and sun fading.
- Rushing the Assembly: Hasty construction can lead to misaligned parts and unsafe seating. Take your time to ensure each piece is securely fastened and aligned.
By being mindful of these pitfalls, you’ll create a bench that’s not only sturdy but also visually appealing.
What’s the Best Wood for Outdoor Benches?
Selecting the right type of wood is crucial for building an outdoor bench that can withstand varying weather conditions while maintaining its aesthetic appeal.
- Cedar: Known for its natural resistance to rot, insects, and decay, cedar is lightweight and has a beautiful grain that ages gracefully into a silvery-gray patina.
- Teak: A premium choice for outdoor furniture, teak contains natural oils that make it exceptionally resistant to moisture and pests. Though more expensive, it offers unparalleled durability.
- Redwood: Similar to cedar, redwood is naturally resistant to rot and insects, with a rich, reddish hue that adds warmth to outdoor spaces.
- Pressure-Treated Lumber: An affordable option treated to resist moisture, decay, and insects. However, it may require more maintenance to keep it looking fresh.
When choosing wood, consider factors like climate, budget, and the desired aesthetic. Always opt for weather-resistant hardwoods for longevity and durability.
How Long Does It Take to Build a Bench?
The time it takes to build an outdoor bench depends on the complexity of the design, your skill level, and the tools you have available. For a simple bench with a basic frame, the project could take as little as 4 to 6 hours, especially if you’re familiar with basic carpentry. However, if you’re incorporating additional features like storage compartments, decorative details, or intricate joinery, the project might extend to 1-2 days. Factoring in time for sanding, staining, and drying adds to the timeline. Planning ahead, having all materials ready, and working methodically will streamline the process. Remember, quality craftsmanship is worth the extra time and effort.
Can I Build a Bench Without Power Tools?
Yes, you can absolutely build an outdoor bench without power tools, although it may require more time and effort. Traditional hand tools like hand saws, hammers, screwdrivers, and chisels can get the job done effectively, especially for simple designs. When working without power tools, it’s important to focus on accurate measurements and precise cuts. Use a miter box to guide your hand saw for straight cuts, and rely on wood glue alongside screws for strong joints. While power tools speed up the process, hand tools offer a rewarding, hands-on experience that many DIY enthusiasts find satisfying. If you’re new to woodworking, starting with a straightforward bench design can help build your confidence before tackling more complex projects.
Conclusion
Learning how to build outdoor seating benches is a rewarding journey that blends creativity, craftsmanship, and functionality. By selecting the right materials, avoiding common mistakes, and maintaining your bench with care, you’ll create a durable piece of outdoor furniture that adds charm and comfort to your space. Whether you’re using power tools or going old-school with hand tools, the process of crafting something with your own hands brings a unique sense of accomplishment. So gather your materials, roll up your sleeves, and start building a bench that will become a cherished spot in your garden for years to come.