
Shrinkwrapping outdoor furnishings is an essential skill for homeowners And businesses looking to protect their valuable outdoor assets from the harsh elements of nature. Whether it’s the biting winter cold or scorching summer heat. Learning how to shrink-wrap patio furnishings can significantly extend the lifespan And maintain the aesthetic appeal of your investment. In this guide, We will walk you through the step-by-step process to shrink wrap outdoor furniture, Ensuring that your cherished pieces are shielded from the detrimental effects of weather, Dust, And other environmental factors.
Why Shrink Wrap Outdoor Furniture?
The advantages of shrinking And wrapping outdoor furniture are numerous And persuasive. It serves as A strong barrier against the weather, Shielding your furnishings from wind, Rain, Snow, UV rays, And other factors that might result in damage, Dading, And early aging. Your outdoor furnishings will stay clean And pest-free all year long with the aid of shrinkwrapping, Which also helps to keep dust And vermin at bay. It also makes upkeep easier by requiring less regular cleaning And storing. In summary, Shrink wrapping offers A hassle-free, Cost-effective option for maintaining the visual appeal And structural integrity of your patio furnishings, Thereby prolonging its lifespan.
What You’ll Need
- Heat Sealing Film
- Heat Gun
- Strapping Or Tie-Downs
- Support Structure
- Tape
- Scissors Or Utility Knife
- Gloves
- Bungee Cords Or Elastic Bands
- Padding Or Cushions
- Cleaning Supplies
- Assistant
Steps To Shrink Wrap Outdoor Furniture
Prepare Your Workspace

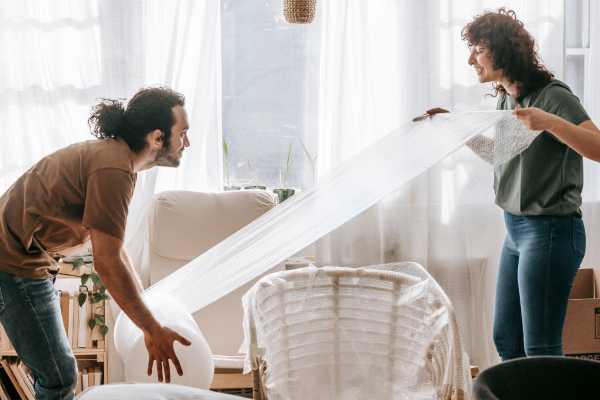
Before embarking on the task of shrink-wrapping your outdoor furnishings, It’s essential to prepare your workspace adequately. Start by gathering all the necessary materials And tools, Such as heat sealing film, A heat gun, Strapping, Tape, Gloves, And any additional support structures. Organize them within easy reach to streamline the process. Clear any obstacles from your workspace to ensure A safe And efficient environment for shrink wrapping. Also, Be sure to don appropriate clothing, including gloves, To protect your hands during the process.
Clear The Area

Remove any items that might obstruct your access to the furniture, Ensuring you have ample space to work comfortably. This not only makes the shrink-wrapping process more convenient but also prevents any unintended damage to other items in the vicinity. A clutter-free workspace will allow you to focus on wrapping the furnishings securely And with precision.
Position The Furniture
Make sure the furniture is clean And dry before you start. You may want to elevate the furnishings slightly off the ground by placing them on wooden blocks or pallets. This helps in preventing moisture from seeping through the bottom. Additionally, If you have several pieces of patio furnishings, Position them in A way that makes the wrapping process more efficient. Ensure there’s enough space between the pieces to work comfortably around each item.
Secure The Furniture Together

This step prevents individual items from shifting during the wrapping process, Which could lead to an uneven or loose wrap. Use strapping or bungee cords to hold the pieces together, Maintaining their intended arrangement. By ensuring the furniture is secure And immobile, You can achieve A more uniform And professional shrink-wrap application. This also simplifies the process of applying the heat sealing film And heat treatment evenly across the entire ensemble.
Ensure You Have The Correct Heat Sealing Roll Size
Measure the dimensions of your furniture to estimate how much heat-sealing material you’ll need. It’s better to have A little extra than to run out mid-process. Choosing the right roll size ensures you can complete the wrapping without interruptions or the need to piece together smaller sections, Which can compromise the effectiveness of the protection.
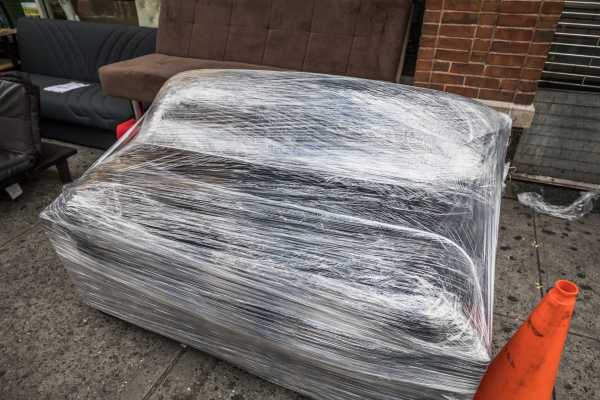
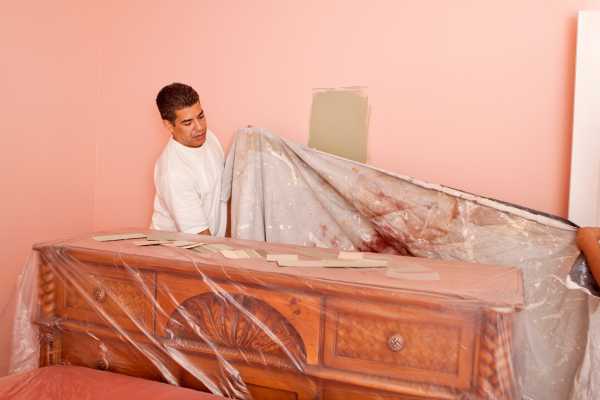
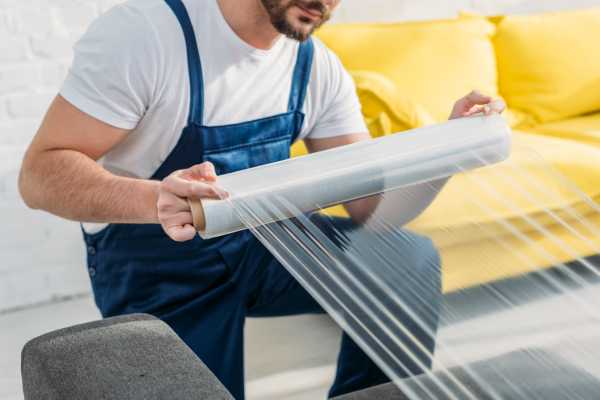
Wrap The Furniture

Begin at the bottom And work your way up, Ensuring each layer slightly overlaps the previous one. Pull the heat sealing tightly, But not excessively, To avoid tearing. Use A heat gun to apply heat evenly, Shrinking the film as you go. Continue this process until the furniture is completely covered. Pay special attention to corners And crevices to create A snug, Weatherproof seal.
Cut Away Any Excess Shrink Wrap Material
Using scissors or A utility knife, Carefully trim away any surplus film. Be cautious not to cut too close to the furniture to prevent accidental damage to the wrapped surface. This step not only ensures A neat And professional appearance but also eliminates any potential weak points in the seal.
Place A Securing Band Around The Base Perimeter Of Your Furniture
To further secure the heat sealing And ensure it stays in place, Place A securing band, Such as strapping or an elastic cord, Around the base perimeter of your furnishings. This extra step provides added stability And minimizes the risk of the wrap coming loose, Especially during windy conditions. It’s A simple yet effective measure that contributes to the long-term protection of your patio furnishings against the elements.
Strap The Furniture
Use strapping or bungee cords to hold the wrapped furniture securely in place. This extra layer of protection helps prevent the heat sealing from unraveling And ensures the furnishings remain stable, especially in windy conditions.
Use A Heat Gun
A heat gun is an essential tool for shrink-wrapping patio furnishings. It is used to apply heat to the heat sealing, Causing it to contract And form A tight, Protective seal around the furnishings. When using A heat gun, Be sure to follow safety guidelines, Including wearing protective gloves, Working in A well-ventilated area, And keeping the heat gun at A safe distance from the heat sealing to prevent overheating or damage.
Add A Vent To The shrink-wrap
This is particularly important in humid or fluctuating weather conditions. By creating A vent, You allow air circulation, Reducing the risk of trapped moisture, Which can potentially damage the furniture.
Is Shrink Wrapping Dangerous?
To ensure safety during the process, It’s important to take precautions. Always wear appropriate protective gear, Such as heat-resistant gloves, And work in A well-ventilated area to avoid inhaling fumes. Be cautious when using the heat gun to prevent burns or overheating of the shrink-wrap material. Additionally, Follow the safety guidelines provided with the heat gun and other equipment. When done with care and attention, shrink-wrapping can be A safe And effective method for protecting your teak outdoor furniture.
How Well Does Shrink Wrap Protect Outdoor Furniture?
Shrinkwrapping patio furnishings provide A high level of protection against various environmental elements. When applied correctly, Heat sealing acts as A sturdy barrier that shields furnishings from rain, Snow, Wind, UV rays, Dust, And pests. It prevents moisture from penetrating, Reducing the risk of rust, Corrosion, And mold. The tight seal created by shrink packaging also helps maintain the furniture’s appearance, Preventing fading And damage to surfaces. The effectiveness of protection depends on the quality of the materials used And the proper application technique. Regular inspections And maintenance may be needed to ensure continued protection.
How Much Does It Cost To Shrink Wrap Outdoor Furniture?
The cost of shrink-wrapping patio furnishings can vary widely depending on several factors. These include the size And quantity of the furnishings, The quality of the heat sealing material, Labor costs if you hire A professional, And your geographic location. On average, You can expect to spend anywhere from $100 to $500 or more to shrink-wrap A set of patio furnishings. Larger And more intricate pieces of furnishings will generally cost more to wrap. Keep in mind that DIY shrink wrapping can reduce costs, But it may require an initial investment in tools And materials. If you choose to hire A professional service, The cost may be on the higher end of the spectrum but ensures A well-executed And time-saving process. It’s advisable to obtain quotes from local service providers or calculate the cost of materials if you plan to do it yourself to get A more accurate estimate.
Final Thoughts
Learning how to shrink-wrap outdoor furniture is A valuable skill for anyone looking to extend life And preserve the beauty of their outdoor furnishings. This protective method offers A robust shield against the elements, Ensuring that rain, Snow, UV rays, And other environmental factors do not compromise the integrity of your investment. By following the step-by-step process outlined in this guide, You can confidently And effectively wrap your patio furnishings, Safeguarding them against damage, Rust, Fading, And pests. Shrinkwrapping simplifies maintenance, Reduces the need for frequent cleaning And storage, And ultimately adds to the longevity of your patio furnishings. With the right materials, Tools, And Techniques, You can enjoy the peace of mind that comes with knowing your patio furnishings are well-protected and ready to withstand whatever nature throws its way.
Pingback: How To Stain Outdoor Furniture